
Single gem application is a foundation skill, not a ceiling. After you've placed 100+ individual gems with consistent bond strength and zero failures, the technical landscape opens toward cluster arrangements, chain designs, and custom tooth charm work that commands premium pricing and sets your portfolio apart.
This isn't territory for beginners. Advanced gem designs multiply every challenge inherent in single-gem application: composite management becomes critical (too much creates bulk and bite interference, too little causes bond failure), enamel surface area limitations become apparent (you can't place unlimited gems on a canine), and design physics override aesthetic preferences (what looks beautiful in a mockup may be physically impossible on actual dentition).
After placing thousands of gems across every tooth surface and configuration, I've developed protocols for complex designs that balance client vision with biomechanical reality. This guide covers what actually works, what fails predictably, and how to have the difficult conversation when a client's Pinterest inspiration isn't viable.
Cluster Arrangements: 2–3 Gem Groupings
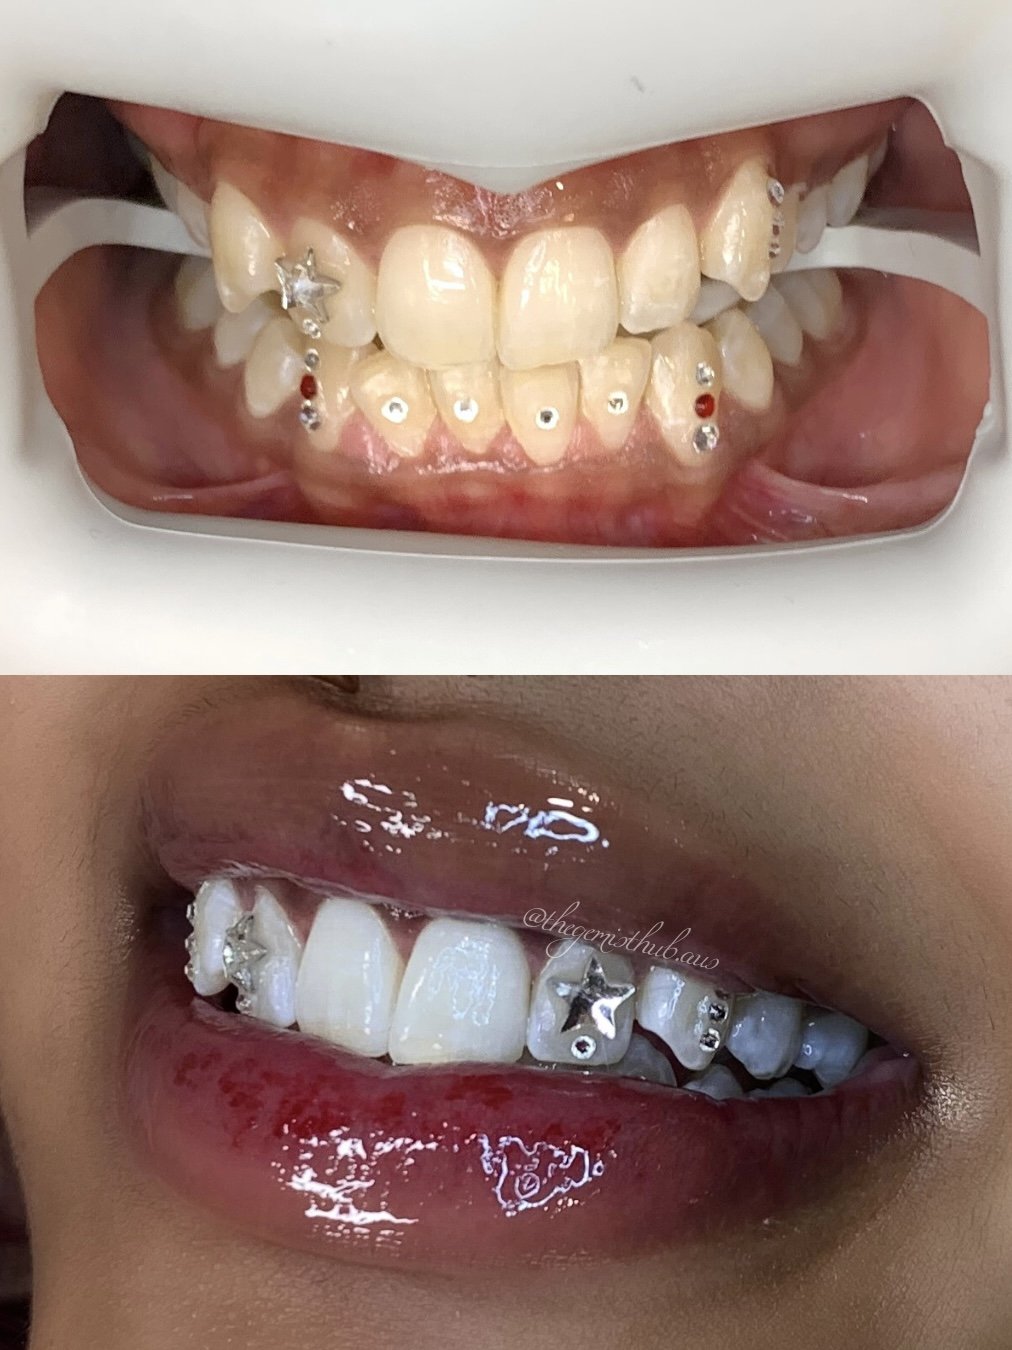
Clusters are the entry point to advanced work. Two or three gems arranged in deliberate geometry on a single tooth create visual impact beyond the sum of their individual sparkle. They also introduce the primary technical challenge of complex designs: composite distribution across multiple attachment sites while maintaining individual bond integrity.
Spacing considerations: Gems in a cluster must be close enough to read as a unified design element (maximum 2mm separation), but far enough apart that each gem sits on its own composite island (minimum 1mm separation). Overlapping composite creates excessive bulk, compromises cure depth, and traps debris in the gaps between gems.
The geometry that works consistently: triangular arrangements on central incisors and canines, linear pairs on laterals. Avoid symmetrical squares or tight grids — they require more enamel surface area than most clients have available after accounting for contact points, gingival margins, and functional wear facets.
Composite management protocol: Etch the entire cluster area as a single zone (this prevents missed spots between gems), but apply composite separately for each gem. Place the first gem, cure fully, then place the second. Sequential curing prevents incomplete polymerisation in the composite between gems. The alternative approach — placing all gems before curing — seems efficient but produces weaker bonds because the curing light can't penetrate adequately through multiple gems.
Size variation strategy: Clusters work best with mixed gem sizes, not uniform dimensions. A 2.8mm primary gem flanked by two 2mm accent gems creates hierarchy and prevents the "stuck-on beads" appearance. The size differential also helps with spatial efficiency — you can fit three varied gems in the same enamel area that would accommodate only two uniform gems.
Chain Designs: Connecting Gems Across Teeth
Gem chains — continuous designs spanning multiple teeth — represent the highest technical difficulty in tooth gem work. You're battling articulation (teeth move independently during function), differential enamel contours (canines curve differently than incisors), and interdental spacing that varies with each client's anatomy.
The harsh reality: true continuous chains (gems physically connected across tooth boundaries) fail mechanically within weeks. Teeth flex, rotate, and translate during mastication, exerting shear forces that fracture rigid connections. I don't offer physically connected chain designs, and you shouldn't either.
Visual chain technique: The viable approach creates the appearance of connection through precise gem placement across adjacent teeth, while maintaining independent bonds on each tooth. A four-gem "chain" across the upper anterior sextant comprises four completely separate applications, positioned to align when the client smiles at rest.
"Advanced designs aren't about defying biomechanics — they're about working with dental anatomy to create visual effects that survive in a functional oral environment."
Alignment protocol: This requires a different consultation approach than single-gem work. Photograph the client's smile at rest (lips relaxed, teeth together), mark the intended gem positions digitally, then verify alignment with the client biting on articulating paper during the actual appointment. Teeth that appear aligned at rest often show 1–2mm discrepancies under occlusal load.
Size gradation across the chain: Uniform gem sizes across multiple teeth create a flat, artificial appearance. Graduate sizes from the midline outward (2.8mm centrals, 2.4mm laterals, 2mm canines) to follow the natural visual hierarchy of the smile. This gradation also accommodates reducing enamel surface area as you move posteriorly.
Master advanced gem techniques with expert guidance. The Gemist Hub Academy Masterclass includes detailed video demonstrations of cluster placement, chain design consultation, and custom charm attachment. Learn from an AHPRA-registered practitioner with 600+ clients worldwide.
Tooth Charms: 18K Gold Attachment Techniques
Tooth charms (semi-permanent gold ornaments) occupy a different technical category than crystal gems. The attachment principles remain the same (acid etch, adhesive, composite), but the material properties of gold versus crystal change everything about handling and curing.
Weight considerations: Gold charms weigh significantly more than equivalent-sized crystals. A 4mm 18K gold charm weighs approximately 0.08g, versus 0.02g for a comparable Swarovski crystal. That four-fold weight difference increases shear stress on the bond, particularly on lower incisors where gravity works against retention. Compensate by using larger bonding surface area (thicker composite layer) and limiting charm size to 5mm maximum on lower anteriors.
Surface preparation for gold: Unlike crystal gems, gold charms benefit from mechanical retention enhancement. Sandblast the bonding surface (50μm aluminium oxide at 2 bar pressure) or etch with acidulated phosphate fluoride gel for 60 seconds, then silanate before applying adhesive. This creates micro-mechanical retention that crystal's faceted back surface doesn't require.
Composite selection: Opaque or gold-tinted composites work better under gold charms than the clear or white composites used for crystals. The gold charm is non-translucent, so underlying composite colour shows at the margins. Match the composite shade to the charm to create a seamless appearance. For intricate charm designs (initials, symbols), use flowable composite to ensure complete adaptation into the charm's relief details.
Curing challenges: Gold blocks light transmission completely, unlike crystals which allow partial cure-through. You must cure from multiple angles (facial, mesial, distal, incisal if accessible) to achieve complete polymerisation of composite under and around the charm. Total cure time: 40 seconds minimum per surface, 120+ seconds total for a single charm. Incomplete curing under gold charms is the primary cause of early debonding.
Custom Grillz-Style Gem Arrangements
Full-arch gem designs covering 6–8 anterior teeth represent the extreme end of cosmetic tooth modification. These arrangements blur the line between tooth gems and permanent cosmetic dentistry, requiring consultation approaches and client screening that differ substantially from standard gem work.
Design consultation intensity: A full-arch gem arrangement is a 90–120 minute procedure requiring multiple mockup iterations, bite analysis, and explicit discussion of functional compromises. Clients requesting this level of coverage often have unrealistic expectations about comfort, speech impact, and maintenance. The consultation framework for these cases must include photographic consent, written acknowledgment of bite interference potential, and discussion of removal logistics.
Occlusion assessment: Before proposing any design covering more than four teeth, perform a functional occlusion check. Have the client bite into articulating paper, then identify all contact points in centric occlusion and lateral excursions. Gems cannot be placed on functional contact areas — they will fracture, debond, or create occlusal trauma. On clients with edge-to-edge bite or significant overbite, full anterior gem coverage may be entirely contraindicated.
Staged application approach: Place maximum four gems per appointment for full-arch designs, allowing the client to adapt to the sensation and verify comfort before proceeding. Attempting to place 8+ gems in a single session creates fatigue for both technician and client, compromises attention to detail, and prevents the client from identifying bite problems before you've committed to the full design.
Functional limitations: Full-arch gem designs impact speech (particularly sibilants and dentals), create awareness during eating (clients report constant sensation of "something on my teeth"), and require significantly more maintenance than single gems. These aren't defects of your application technique — they're inherent consequences of covering large enamel surface areas. Clients must understand this before you begin.
Design Consultation Framework: Managing Client Expectations
Advanced gem work requires a fundamentally different client interaction than single-gem application. You're not simply executing a predefined service — you're collaborating on custom design while maintaining professional authority over what's biomechanically viable.
Portfolio review process: Show clients examples of completed advanced work from your own portfolio, not Instagram screenshots from other technicians. Explain what made each design successful (adequate spacing, appropriate tooth selection, realistic gem sizing) and what limitations you navigated (avoiding contact points, managing enamel curvature). This frames the consultation as problem-solving, not order-taking.
Mockup tools: Digital mockups (Photoshop, Procreate, or specialised dental smile design software) let clients visualise designs before you've committed etchant to enamel. Take a high-resolution smile photo, overlay gem designs, then review with the client. Expect 2–4 mockup revisions for complex cluster or chain designs. Charge a design consultation fee ($50–$100) for this service on advanced work — it's skilled labour that takes 30–60 minutes.
The "no" conversation: You will encounter design requests that aren't physically viable. Gems on molars (impossible to maintain, constant food impaction). Chains connecting canine to first premolar (crosses into functional occlusion zone). Clusters on lateral incisors with insufficient enamel due to wear or enamel hypoplasia. Saying "I can't do that safely" is professional judgment, not lack of skill. Offer alternative designs that achieve similar aesthetic goals within biomechanical constraints.
Photographing Complex Designs for Portfolio
Advanced gem work deserves documentation that showcases the technical execution, not just the sparkle. Amateur photography flattens spatial relationships and loses the dimensional impact of cluster arrangements.
Lighting setup: Ring flash or dual point-source lights positioned at 45-degree angles to the smile axis. This creates the facet reflections that demonstrate gem quality while maintaining enough shadow to show dimensional relief in clusters. Overhead lighting or on-camera flash produces flat images where individual gems in a cluster blur together.
Focal length and distance: Macro lens (100mm minimum) at close working distance (30–40cm) isolates the gem work and creates background separation. Phone cameras and standard lenses require getting too close, distorting facial proportions and making the design look amateur despite expert execution.
Composition standards: Capture three views for each advanced design: full smile (shows overall design context), close smile (shows gem arrangement detail), and extreme close-up (demonstrates individual gem bond quality and composite margins). The full smile goes on social media, the close-ups go in your professional portfolio for client consultations.
Post-processing restraint: Minimal editing. Adjust exposure and colour temperature to match natural viewing conditions, but resist the urge to increase contrast or saturation to make gems "pop" more. Overedited images create unrealistic client expectations and misrepresent the actual in-person appearance.
Pricing Advanced Work: Time-Based Versus Design-Based
Single-gem pricing ($80–$150 per gem in Australian metropolitan markets) doesn't scale linearly to advanced work. A three-gem cluster isn't three times the work of a single gem — it's four to five times the work due to design consultation, mockup creation, and complex composite management.
Design complexity tiers: Establish clear pricing levels based on design category, not individual gem count. Simple cluster (2–3 gems, single tooth, standard arrangement): $300–$450. Complex cluster (4+ gems, multiple teeth, custom arrangement): $600–$900. Tooth charms: $400–$700 depending on gold weight and design intricacy. Full-arch arrangements: $1,200–$2,000.
Consultation fee structure: Charge separately for design consultation ($50–$100) on complex work, creditable toward the final service if the client proceeds. This compensates you for the 30–90 minutes of mockup creation and design iteration, and filters out clients who aren't serious about commissioning custom work.
Time-based premium: For truly custom designs (client brings a sketch or concept you've never executed), quote hourly rates ($150–$250/hour) plus materials rather than package pricing. This protects you when a "simple" client request reveals unforeseen technical challenges during execution. See the comprehensive pricing framework guide for detailed service tier structures.
Common Mistakes in Multi-Gem Applications
Advanced designs amplify the consequences of errors that single-gem work might forgive. These are the recurring failures I observe in portfolio reviews and workshop troubleshooting sessions:
Insufficient etch coverage: Etching individual spots for each gem in a cluster, rather than etching the entire cluster zone as a unified field. This creates unetched gaps between gems where saliva contamination prevents adhesive penetration. Etch generously — 2mm beyond your outermost gem positions in all directions.
Simultaneous gem placement: Positioning all gems in a cluster before curing any composite, attempting to cure the entire arrangement in one light cycle. Cure depth through multiple overlapping gems is inadequate. Each gem shadows the composite behind it from the curing light. Place and cure sequentially, accepting the slightly longer procedure time in exchange for reliable bond strength.
Ignoring occlusal clearance: Placing gems based solely on aesthetic positioning without checking clearance in all functional jaw movements. A gem that clears in centric occlusion may contact during lateral excursion, creating fracture risk and client discomfort. Check clearance with articulating paper in centric, left lateral, right lateral, and protrusive positions before curing.
Overloading small teeth: Attempting to place cluster arrangements on lateral incisors or canines that lack adequate enamel surface area. Lower lateral incisors in particular have limited facial surface area, often 20–30% less than centrals. A cluster design that works beautifully on a central incisor may be physically impossible on a lateral without extending into unacceptable zones (gingival margin, contact points, lingual surface).
Uniform gem sizing: Using identical gem sizes throughout a cluster or chain design. This creates visual monotony and suggests technical limitation rather than design intentionality. Vary sizes by 0.4–0.8mm to create hierarchy and visual interest. The exception: deliberately uniform sizing for geometric patterns (grid, constellation), where consistency is the design feature.
When to Say "This Design Won't Work"
Professional credibility requires knowing your technical limits and communicating constraints clearly. These are automatic disqualifications for advanced gem designs:
Active dental disease: Visible caries, gingival inflammation, or significant calculus accumulation. Advanced gem work on compromised dentition isn't cosmetic enhancement — it's malpractice. Refer to a dentist for treatment, then offer gem services after oral health is restored. No exceptions, regardless of client insistence or payment offered.
Insufficient enamel: Teeth with significant wear facets, erosion, or enamel hypoplasia lack adequate bonding surface for complex designs. You need minimum 4mm × 4mm of sound enamel for a two-gem cluster, 6mm × 6mm for three gems. If the available enamel doesn't support the client's desired design, propose alternative placement (different teeth) or simplified design (fewer/smaller gems).
Bite interference: Designs that would place gems on functional occlusal contact points. This is non-negotiable. Gems cannot withstand masticatory forces and will fracture or debond, potentially causing enamel damage at detachment. If the client's occlusion pattern doesn't accommodate their desired design, offer alternative aesthetics or decline the work.
Unrealistic maintenance commitment: Full-arch gem arrangements require meticulous oral hygiene and professional cleaning every 3–4 months to prevent composite staining and gingival irritation from plaque accumulation around gems. Clients who currently struggle with basic oral hygiene aren't candidates for advanced gem work. Assess oral hygiene status during consultation — if you observe significant plaque or calculus, postpone advanced designs until hygiene improves.
Advanced Techniques Are a Business Differentiator
The tooth gem market is increasingly commoditised at the single-gem level. Mobile technicians offer $50 gems at festivals, beauty salons add gems as an impulse add-on to other services, and online tutorials convince people they can DIY. Competing on price in this environment erodes profitability and professional positioning.
Advanced gem work — clusters, custom charms, full-arch designs — exists in a different market segment. These services require demonstrable skill, can't be easily replicated by untrained competitors, and command premium pricing that supports sustainable business operations. Clients seeking advanced work are self-selecting for quality and expertise, not bargain pricing.
Building an advanced gem portfolio differentiates your brand, attracts serious clients, and creates pricing power. A technician known for complex custom designs can charge $150 for single gems (as the entry-level service in a premium portfolio) while competitors struggle to maintain $80 pricing. The advanced work creates the halo effect that elevates your entire service offering.
But this positioning requires technical mastery first. You cannot market advanced capabilities while producing inconsistent results or experiencing bond failures. Perfect single-gem application across hundreds of clients, then progress systematically to clusters, then chains, then custom charms. Each level builds on the previous foundation. Attempting advanced designs before mastering fundamentals produces portfolio work that actually damages your credibility rather than enhancing it.
Ready to elevate your tooth gem skills to the advanced level? The Gemist Hub Academy Masterclass provides comprehensive training in cluster designs, custom charm application, and complex client consultation. Learn directly from an AHPRA-registered Oral Health Therapist with extensive advanced gem portfolio work. Explore the curriculum and secure your place in upcoming masterclass sessions.